
Overview
 Screen Elf is a screen productivity tool which lets you undertake a number of common tasks associated with using your
computer screen and webcam. It can be used to live stream the contents of your webcam or desktop to a streaming service
such as YouTube or FaceBook. Record your desktop and Webcam for tutorials and presentations.
Capture Screenshots of your work. Act as a Dictation Machine (Speech To Text), convert images to text and text to speech,
and provide remote surveillance of a room or area using its motion detector and Webcam capture capabilities.
Screen Elf is a screen productivity tool which lets you undertake a number of common tasks associated with using your
computer screen and webcam. It can be used to live stream the contents of your webcam or desktop to a streaming service
such as YouTube or FaceBook. Record your desktop and Webcam for tutorials and presentations.
Capture Screenshots of your work. Act as a Dictation Machine (Speech To Text), convert images to text and text to speech,
and provide remote surveillance of a room or area using its motion detector and Webcam capture capabilities.
Screen Elf is a nimble application specifically designed for those unfamiliar with video, audio and OCR technology
Screen Elf can be used for a wide range of business, educational. It is available for Windows 10 from the Microsoft Store
as well as for windows 7/8 and 10 from this website.

System Requirements
- Operating System:Windows 7/8/10 or later.
- Memory:1GB or above for good performance.
- CPU:Intel Core i5, ARM equivalent or above for good performance.
- Apparatus:Webcam, Microphone or Headset.
How To Install Screen Elf
Step 1
Download the screen Elf application from screenelf.com or from the Microsoft Store.
Step 2
Click on the downloaded installation file to launch the installation wizard which will guide you through
the installation.
Step 3
Once Screen Elf is installed you can click on the Screen Elf icon
in the start menu or on the desktop to launch the application.
License Key
The Free version of Screen Elf is free and you can start using it straight away. For the STANDARD and
PROFESSIONAL versions you will need to enter the License key which was emailed to you when you purchased the
product. If you purchased the product from the Microsoft Store the license key will already be installed.
To enter the License Key, click on the Setup icon to bring up the Options dialog box.
In the 'General' tab at the bottom of the dialog, enter your License key in the text box. Click OK and the product will be
activated and ready for use. If you register the product online, your license key can be retrieved from your account at any time.
How To Uninstall Screen Elf
Exit the application by right-clicking on the Screen Elf icon in the systray and selecting Exit.
You can then uninstall Screen Elf like any other application on your Windows system.
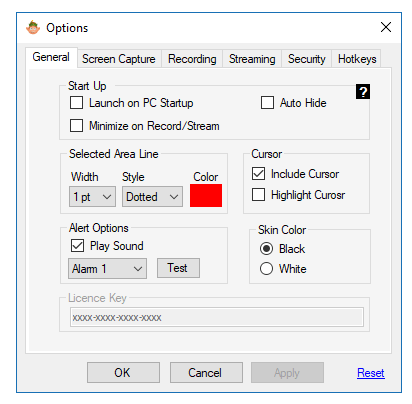
General Settings
The General tab of the Options dialog lets you specify general settings for the application.
The following options can be set.
Launch on PC Startup - Launch Screen Elf when your PC starts up.
Show in Taskbar - Show the Screen Elf icon in the taskbar.
Minimize on Record/Stream - Minimize Screen Elf to the Systray when the Record or Stream button is clicked.
Auto Hide - Hide Screen Elf at the top of the screen after 15 seconds. (Mouse over to bring back)
This feature is active when Screen Elf is docked to the top of your screen.
Selected Area Line - Specify the width, style and color of the selected area rectangle.
Include Cursor - Include the mouse cursor in the image/recording.
Highlight Cursor - Highlight the cursor
Play Sound - Play a sound on image capture. Select and test the sound to play.
Skin Color - Select the background color of Screen Elf (Black or White).
Screen Capture

Overview
Screen Elf can be used to capture still images from your computer screen or Webcam and save them to file,
clipboard or print. The Screen Capture tab in the Options dialog lets you specify how the screen capture
operation is implemented. You can capture images manually and give each image a name as it is saved, or you
can have the image file saved automatically with a date and time stamp. Images can be captured using a mouse
click or by specifying and using a hotkey combination.
The captured image file can also be emailed to any recipient automatically if your outgoing email server details
are present in the Security tab..
Screen Capture Settings
The Screen Capture tab of the Options dialog lets you specify the settings for the screen capture operation. Click on the Screen Elf Setup icon to open the Options dialog
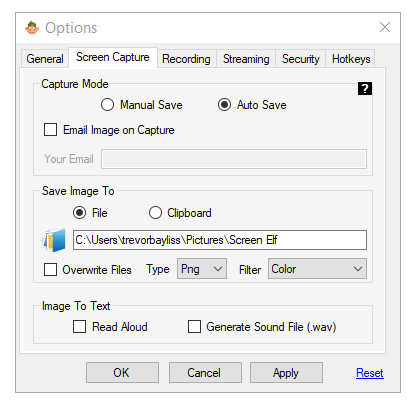
Manual Save - The save dialog box will be displayed allowing you to specify a name and location
for the file when the 'Capture' button is clicked..
Auto Save - The captured image file will be saved automatically with a Date & Timestamp to
the folder specified or sent to the clipboard.
Email Image on capture - Specify an email address to send the captured image to.
(Note: To use the email feature you must complete the Outgoing Mail Server details in the Security tab).
Overwrite files - Overwrite the last file saved.
Type - Specify the image file format.
Filter - Save the image in color or greyscale.
Read Aloud - Have Screen Elf read text aloud after an Image To Text conversion.
Generate Sound File - Create a sound recording of the Read Aloud text while reading aloud.
Reset - Reset the Screen Capture tab to its default settings.
Other settings on the General Tab that affect Screen Capture.
Include Cursor - Capture the mouse cursor in the image.
Highlight Cursor - Highlight the mouse cursor in the image.
Width, Style, Color - Choose the width style and color of the select rectangle.
Play Sound - Play a sound on capture.
Capture Full Screen
To capture the full screen, select Capture Full Screen in the dropdown box and click on the
green Capture button. You can print the full screen image instead by clicking on the
Print button.
To see the captured image click on the View folder icon to bring up the file explorer dialog.
Double-Click on the file to launch your Windows image viewer.
Capturing a Web Page with Scrolling region
By default Screen Elf captures the visible portion of your screen. To capture a web page including its scrolling
region, highlight the URL in the address bar and copy it to the Clipboard using CTRL + C or Copy,
before clicking on the green Capture button.
Screen Elf will disappear from your screen for a few seconds whilst it renders the image and then return.
To see the captured image click on the View folder icon to bring up the file explorer dialog.
Double-Click on the file to launch your Windows image viewer.
Capture Selected Area
Screen Elf lets you capture any area of your desktop as opposed to the whole screen. To capture a selected area,
select Capture Selected Area in the dropdown box. A translucent rectangle will appear. Place
the rectangle over the area you wish to capture and adjust its dimensions by draging its top right corner.
Make sure that the image you wish to capture is firmly within the colored select rectangle.
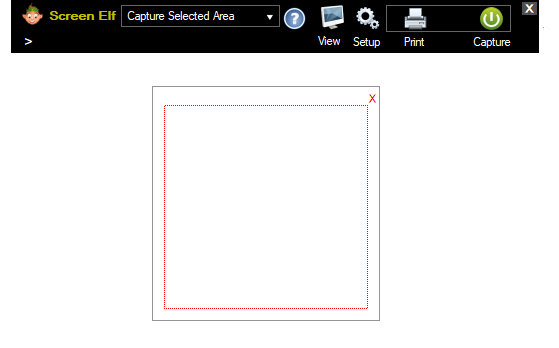
Click on the green Capture button to capture the image under the rectangle or click on the Print button to print
the image instead.
To see the captured image, click on the View folder icon to bring up the file explorer dialog.
Double-Click on the file to launch your Windows image viewer.
Capture Webcam
To capture your Webcam or Camera select Capture Webcam in the dropdown box. The Webcam viewer
will appear on the screen. You can adjust the brightness, contrast, gamma and zoom of the image using the
settings menu in the Webcam viewer. Click on the green Capture button to capture the Webcam image or click on
the Print button to print the image.

To see the captured image click on the View folder icon to bring up the file explorer dialog.
Double-Click on the file to launch your Windows image viewer.
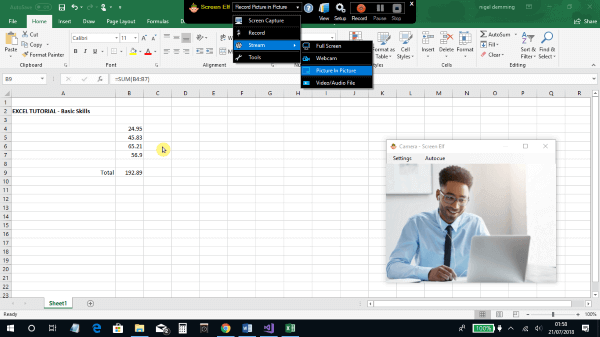
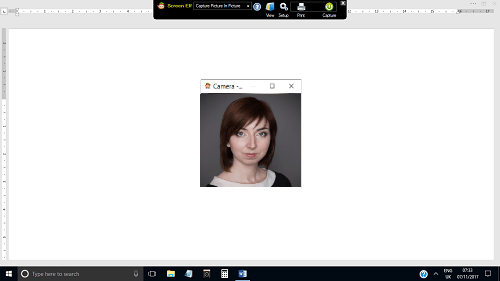
Capture Picture in Picture
Screen Elf lets you capture both your screen and Webcam simultaneously (Picture In Picture).
Select Capture Picture In Picture in the dropdown box. Adjust the position of the Webcam viewer
on the screen, Click on the green Capture button to capture the composite image or click on the Print button to print the image.

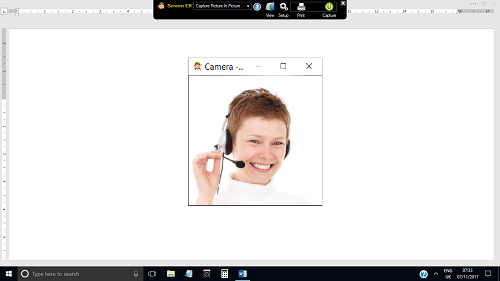
To see the captured image click on the View folder icon to bring up the file explorer dialog.
Double-Click on the file to launch your Windows image viewer.
Screen Recording
Overview
Screen Elf can be used to record your computer screen or Webcam/Camera. The Recording tab in the Setup Options dialog
lets you specify how the screen recording operation is implemented.
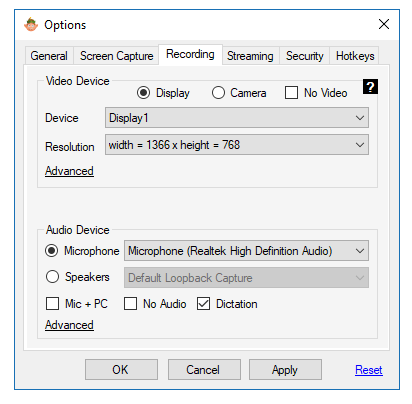
Screen Recording Settings
The Recording tab of the Options dialog lets you specify the settings for the screen recording operation.
Click on the Screen Elf Setup icon to open the Options dialog.
Unlike other applications on the market Screen Elf has been designed with non-technical users in mind.
If you're not familiar with Video and Audio terminology you can just use the default basic settings which you can
revert back to at anytime by clicking on the Reset button at the bottom of the tab.
If you have some knowledge of video and audio settings you can click on Advanced in the tab to show the advanced settings and
adjust them to suit your needs.
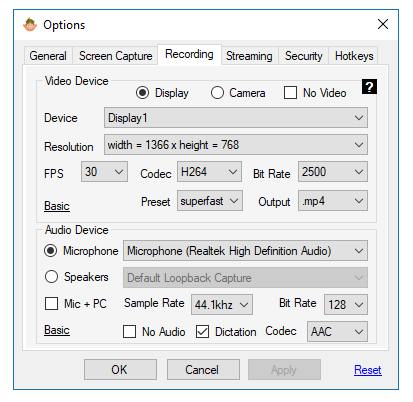
Video settings
Video Device - If you have multiple screens or cameras attached to your computer, use the
option buttons for Screen and Camera to select the display or camera that you want to use for the recording.
Display/Camera - Specify which display or camera device to use in the recording.
Resolution - Specify the Video Resolution for the Screen or Webcam/Camera.
FPS - Specify the Frames Per Second that you wish to record the screen at.
Codec - Specify the Video Codec to use. (Default H264)
Bit Rate - Specify the Video Bit Rate in kbs (Kilobits per second).
Preset - Encoder Preset settings - H264 Codec
Output - Specify the Output file format, .mp4, or .wmv. The file will be saved in the folder
specified in the Screen Capture tab.
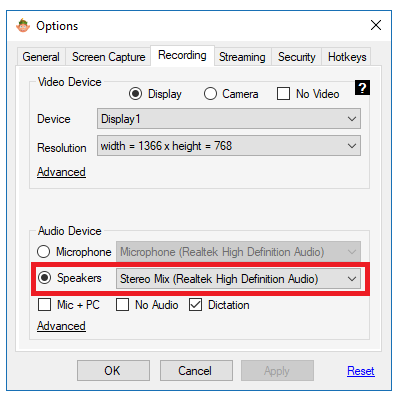
Audio Settings
Microphone - Select the Microphone you wish to use with your recording.
Speakers - Select the Default Audio Capture to record music playing on your PC.
Mic + PC - If you wish to record both PC sound and microphone simultaneously, you will need to enable
and select the Windows Stereo Mix device.
Sample - Specify the Audio Sample Rate in khz.
Bit Rate - Specify the Audio Bit Rate in kbs (Kilobits per second).
No Audio - Enable to exclude audio from the recording.
Record Dictation - Enable to record your voice when using the Dictation (Speech To Text) mode.
Codec - Select the Audio Codec you wish to use with your recording.
Reset - Reset the recording tab to its default values.
Note: Screen Elf can minimize automatically at the start of a recording to prevent
the Screen Elf panel from appearing in the recording itself. Tick the Minimize on Record/Stream
setting in the General tab of the options dialog.
Settings on the General Tab that affect Screen Recording.
Minimize on Record/Stream - Minimize Screen Elf when the recording starts.
Include Cursor - Capture the mouse cursor in the recording.
Highlight Cursor - Highlight the mouse cursor in the recording.
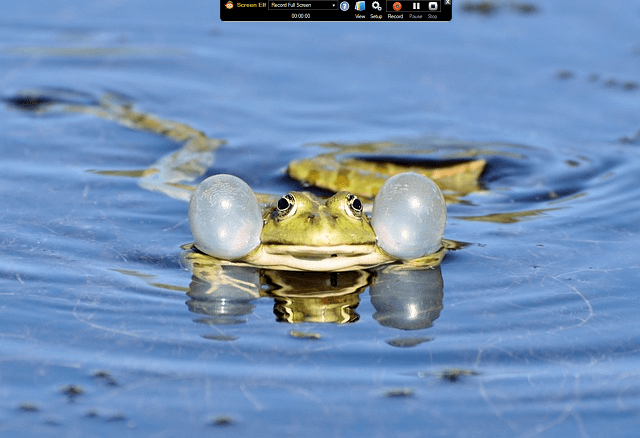
Record Full Screen
To record the full screen, select Record Full Screen in the dropdown box and then click on the red
Record button. The recording will start when the red dot in the Record button starts flashing. The recording
duration indicator will be displayed showing the length of the recording. You will also see the fps (frames per second)
and video bitrate kb/s.
Use the Pause button to Pause the recording and the Stop button to stop the recording.
The recorded file will be saved in the folder that you specified in the Screen Capture tab.
To see the recording click on the View folder icon to bring up the file explorer dialog.
Double-Click on the file to launch your Windows media player to play the recording.
Recording Audio
To record your 'Microphone', select the Microphone option and choose the microphone from the dropdown list.
If you wish to record the sound playing on your PC select the 'Speakers' option and choose the Default Audio Capture
from the dropdown list. To record both microphone and speakers simultaneously select 'Mic + PC'. You will be prompted to set up the Windows Stereo Mix
device. The Windows Stereo Mix device lets you record your Mic and Speakers simultaneously., record your speakers alone and enable
you to live stream sound.
Record Selected Area
Screen Elf lets you record any area of your desktop as opposed to the whole screen. To record a selected area,
select Record Selected Area in the dropdown box. A translucent rectangle will appear. Place
the rectangle over the area you wish to capture and adjust its dimensions by draging its top right corner.
Make sure that the image you wish to capture is firmly within the colored rectangle.
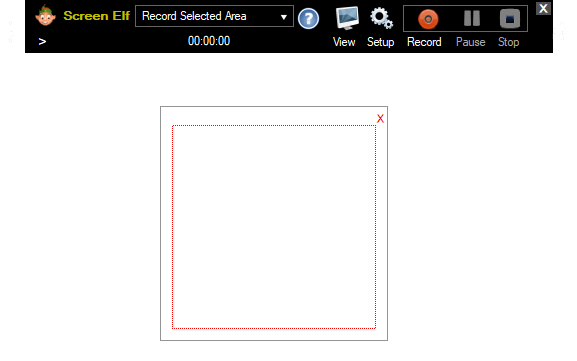
Click on the red record button to record the area under the rectangle. The recording will start when the red
dot in the Record button starts flashing. The recording duration indicator will be displayed showing the length of
the recording. You will also see the fps (frames per second) and video bitrate kb/s.
Use the Pause button to pause the recording and the Stop button to
stop the recording. The recorded file will be saved in the folder that you specified in the
Screen Capture tab.
To see the recording click on the View folder icon to bring up the file explorer dialog. Double-Click
on the file to launch your Windows media player to play the recording.
Record Webcam
To record your Webcam or Camera select Record Webcam in the dropdown box. The Webcam image
will appear. Click on the red record button to record the Webcam image.
Use the Pause button to pause the recording and the Stop button to stop the
recording. The recorded file will be saved in the folder that you specified in the Screen Capture tab in the
Options dialog.
To see the recording click on the View folder icon to bring up the file explorer dialog. Double-Click
on the file to launch your Windows media player to play the recording.
Webcam Autocue
An Autocue/Teleprompter is available when using the Webcam to record or Stream. The Autocue let's you speak
directly into the webcam from a script without averting your gaze. The Autocue can also read questions aloud
allowing you to practice interview responses, public speaking, acting roles, and a whole range of activities that
require interaction with an audience.
Using the Autocue
The Autocue is launched by clicking on the 'Autocue' menu item in the webcam viewer.
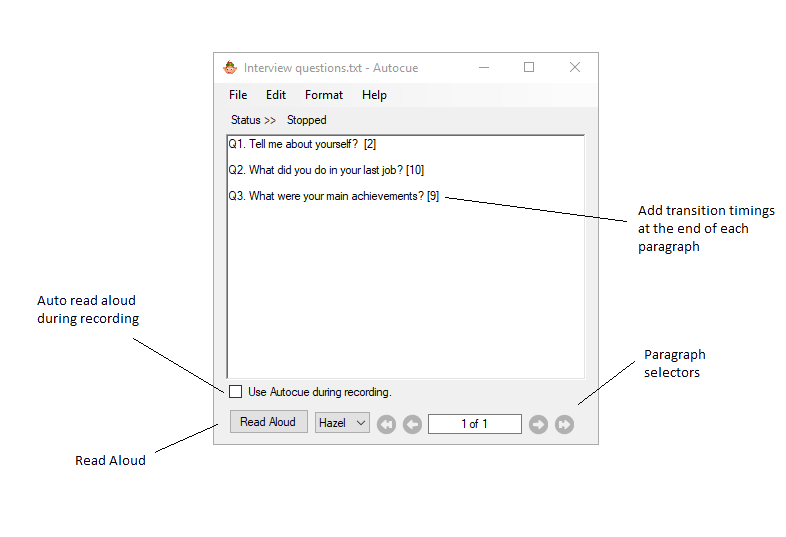
Enter your text in the text area. Each paragraph of text can optionally have a transition timing value inserted at
the end of the paragraph, which can determine when the paragrapgh is spoken when Screen Elf is recording the webcam.
Transition timings are in whole seconds and placed between square brackets at the end of the paragraph.
In the example shown above the user has listed three typical interview questions on three paragraphs.
At the end of each paragraph a transition time is inserted in square brackets.
If the checkbox 'Use Autocue when recording' is checked, the first question in the list will be read out to the user 2 seconds after
the recording starts. The second question will be read out loud 10 seconds after the previous paragraph and the last question
will read out aloud 9 seconds after the previous paragragh.
You can start from any paragraph in the text by placing the cursor on that paragraph.
Record Picture in Picture
Screen Elf lets you record both your screen and Webcam simultaneously (Picture In Picture). This is ideal where
you want to demonstrate something on your computer screen at the same time as allowing your audience to see your face.
Select Record Picture In Picture in the dropdown box. Adjust the position of the Webcam viewer
on the screen, Click on the red record button to record Picture In Picture.
Use the Pause button to pause the recording and the Stop button to stop the
recording. The recorded file will be saved in the folder that you specified in the Screen Capture tab in the
Options dialog.
To see the recording click on the View folder icon to bring up the file explorer dialog. Double-Click
on the file to launch your Windows media player to play the recording.

Recording - Troubleshooting
Video Stutter
If the video is stuttering when you playback a recording, it is an indication that the CPU in your computer is
being starved of the processing power required to record at full speed. Often this issue is encountered on
computers with slow processors, not enough memory, or outdated video card drivers.
Try the following in order of preference to correct this.
-
1. If you are recording with the Webcam Viewer maximized. Reduce the size of the Webcam Viewer
image. The Webcam will still be recorded but less CPU power is required.
-
2. In the Recording tab, show the advanced settings and reduce the Encoder Preset setting from Superfast to Veryfast or lower.
You can adjust this setting up or down to suit your environment. Lower values provide better video compression but
require more CPU power.
-
4. Try reducing the Framerate or Frames per second (FPS) at which you are recording. Lower framerates
require less CPU power.
-
5. Decrease the Video Resolution while recording. A lower video resolution requires less CPU power.
-
6. If your PC energy management settings are set to low energy management, then you can try increasing it's
energy settings to medium or high performance energy management to provide more CPU power.
-
7. Update outdated Video Drivers.
Streaming

Overview
Screen Elf can be used to live stream your desktop or Webcam to a streaming service such as IBM UStream,
YouTube or Twitch. As well as live streaming from your desktop or Webcam you can also stream directly from a pre-recorded
Video file.
If you're not familiar with Streaming or Streaming terminology download our beginners guide to Streaming in the
footer of this page.
Stream Settings
The Streaming tab in the Options dialog lets you specify how the live Stream operation is
implemented including whether to record as well as stream. Click on the
Screen Elf Setup icon to open the Options dialog.
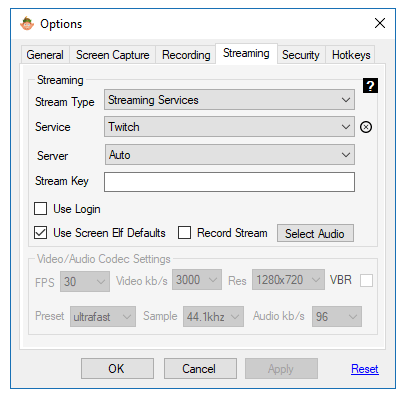
Streaming Type - Choose 'Streaming Services' to use one of the pre-set service providers.
Alternatively select 'Custom' to supply the Stream Server URL yourself.
Service - select the Streaming Service that you are signed up to.
Server - Select the Streaming Server or leave on Auto.
Stream URL - Where shown, input the Stream URL of your service provider.
Stream Key - Enter the Stream Key supplied by your service provider.
Use Login - Enable to input your logon username and password if required by
your service provider.
Use Streaming Defaults - Use the Screen Elf default Video and Audio settings for the streaming.
Record stream - Select to record while streaming. The file location is set in the Screen Capture tab.
Select Audio - Select the audio you wish to include in the stream.
FPS - Specify Video Frames Per Second (Defualt 30 FPS USA NTSC, 25 FPS UK/Europe PAL).
Video Rate - Video Bit Rate in kbs (Kilobits per second).
Res - Video Output Resolution.
VBR - Select to use Variable Bit Rate. By default Screen Elf streams at a constant bit rate.
Preset - H264 Encoder Preset.
Sample - Audio Sample Rate.
Audio Rate - Audio Bit Rate in kbs (Kilobits per second).
Reset - Reset to Screen Elf Streaming defaults.
Other settings on the General tab that affect Streaming.
Minimize on Record/Stream - Minimize Screen Elf when the streaming starts.
Include Cursor - Capture the mouse cursor in the stream.
Highlight Cursor - Highlight the mouse cursor in the stream.
Stream Full Screen
To stream your full screen, select Stream Full Screen in the dropdown box and then click on the
red Stream button. The streaming will start when the red dot in the Stream button starts flashing. The time
duration indicator will increment showing the length of time of the streaming. Use the Stop button
to stop the streaming.
You can stream and record simultaneously if you have the 'Record while Streaming' checkbox selected in the Streaming tab.
The recorded file will be saved in the folder that you specified in the Screen Capture tab.
To see the recording click on the View folder icon to bring up the file explorer dialog. Double-Click
on the file to launch your Windows media player to play the recording.
Streaming Audio
In order to stream music playing on your computer, you need to have the sound capture device in
your PC enabled. In Windows the sound capture device is typically called the 'Stereo Mix' device, other names like
'Wave Out Mix', 'Mixed output' and 'What You Hear' have also been used in the past by manufacturers for these devices.
If your Stereo Mix device is already enabled in Windows, it will appear in the dropdown list of 'Speakers' available in
the Screen Elf Recording tab and in the Audio Setup Wizard.
 You only need to select the Stereo Mix device when you want to live stream the sound coming through your PC speakers.
If you only need to stream your microphone the Stereo Mix device is not required.
You only need to select the Stereo Mix device when you want to live stream the sound coming through your PC speakers.
If you only need to stream your microphone the Stereo Mix device is not required.
Stream Webcam
To live Stream your Webcam or Camera select Stream Webcam in the dropdown box. Click on the
red Stream button to stream the Webcam image.
Use the Stop button to stop the streaming.


Stream Picture in Picture
Screen Elf lets you stream both your desktop and Webcam simultaneously (Picture In Picture). Select
Stream Picture In Picture in the dropdown box. Adjust the position of the Webcam viewer on the
screen, Click on the red Stream button to stream your desktop and webcam.
Use the Stop button to stop the streaming. You can stream and record simultaneously if you have the
'Record while Streaming' checkbox selected.
The recorded file will be saved in the folder that you specified in the Screen Capture tab.
To see the recording click on the View icon to bring up the file explorer dialog. Double-Click on the file to
launch your Windows media player to play the recording.


Stream Video/Audio File
To live stream a pre-recorded Video or Audio file Select Stream Video/Audio File in the dropdown box. The
open file dialog will appear allowing you to select the file you wish to stream. Select a file and then
click on the red stream button to start streaming the file.
Use the Stop button to stop the streaming.
Image To Text/Speech

Overview
Screen Elf has an Optical Character Recognition (OCR) interface which let's you convert images to text and Text to
speech. This feature is useful where you do not have access to the original text displayed on your screen or where you
wish to convert handwritten or printed text from images. You simply select the image on the screen you wish to convert
and Screen Elf will convert it to a text file and optionally read it aloud if required.
Image To Text/Speech Settings
The Image To Text function uses settings specified in the Screen Capture tab of the Options dialog to determine
operation.
The Screen Capture tab of the Options dialog lets you specify the settings for the screen capture operation.
Click on the Screen Elf Setup icon to open the Options dialog.
The following options are relevant to Image To Text conversion.
Manual Save - The save dialog box will be displayed allowing you to specify a name and location
for the file. The image file is converted to a text file.
Auto Save - The captured image file will be converted to text and saved automatically with a
Date & Timestamp to the folder specified.
Email Image on capture - Specify an email address to send the converted text file to. (Note: To
use this feature you should complete the email Server details in the Security tab).
Overwrite files - Overwrite the last file saved.
File Type - In Image To Text mode the output file will always be a .txt file.
Read Aloud - When enabled the converted text file will be read aloud using the speech
synthesizer.
Generate Sound File - Enable to create a sound file from the read aloud text.
Reset - Reset the Screen Capture tab to its default settings.
Convert Images To Text/Speech
To convert an image to text, select Image To Text Convertor in the dropdown box from the Tools menu.
A translucent rectangle will appear. Place the rectangle over the area you wish to capture and adjust its dimensions by
draging its top right corner. Make sure that the image you wish to capture is firmly within the colored rectangle.
Click on the green Capture button to convert to text.
If you have enabled the 'Read Aloud' setting the converted text file will be read aloud. If you have enabled the 'Generate
Sound file' a .wav file of the sound will be created.

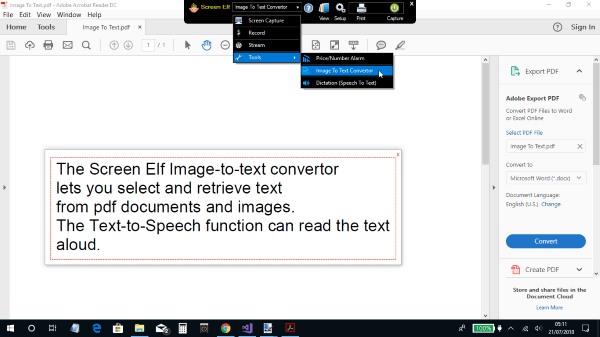
To see the converted text file click on the View folder icon to bring up the file explorer dialog.
Double-Click on the file to launch your Windows text viewer.
.
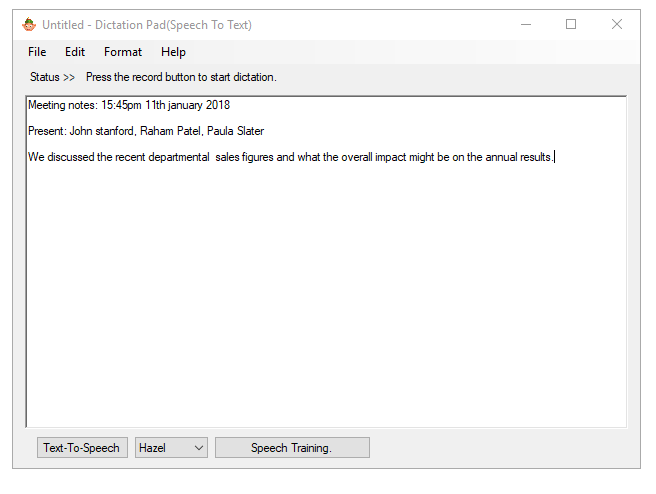
Dictation (Speech To Text)

Overview
The Dictation Pad provides Speech-to-Text and Text-to-Speech output. You can speak and have your spoken words appear
in the Dictation Pad which you can copy to the clipboard or have saved automatically as a file.
The dictation Pad can also read aloud any text which you have pasted into it.
Settings
The main settings for the Dictation Pad are accessed from the menu at the top the Dictation Pad. Most of the settings are
for creating, saving and editing documents. Settings specific to the text in the dictation Pad are:
Help >Voice Commands - Show Voice and Punctuation Commands.
Format>Font - Set the font size of the text.
Read Aloud - Read the text in the Dictation Pad aloud.
Using the Dictation Pad
To begin using the Dictation Pad select 'Dictation (Speech To Text)' from the dropdown menu.
The Dictation Pad will appear. Click on the record button to start dictating.
Your spoken words will appear in the Dictation Pad. By default your spoken words are recorded. If you don't want to create a recorded MP3 file
while using the dictation pad, disable the 'Record Dictation' checkbox in the Recording tab
of the options dialog.
The folder location of the recorded files is specified in the 'Screen Capture Tab' of the Screen Elf set up dialog.
The quality of dictation depends on a good Microphone or headset and clear voice commands.
The dictation Pad uses your default Microphone. The Dictation Pad relies on the internal speech recognition functionality
of Microsoft Windows and you should train your computer to better understand your voice by using the 'Speech Training' button.
The more you train your computer to understand your voice, more of what you say will be accurately displayed in the dictation pad.
Voice Commands
A full list of the voice commands for dictation and punctation can be displayed by clicking on the
Help>Voice Commands menu at the top of the dictation Pad.
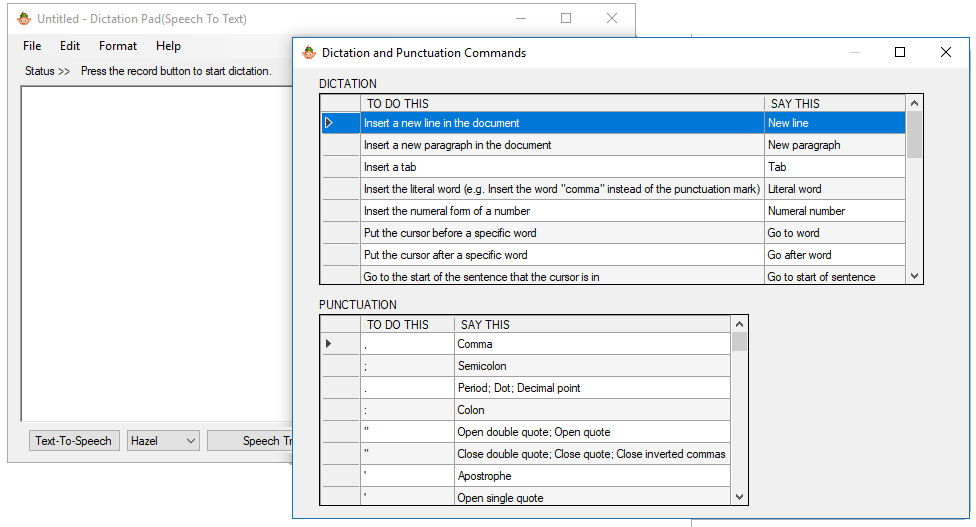
Dictation
| To Do This |
Say This |
| Insert a new line in the document |
New line |
| Insert a new paragraph in the document |
New paragraph |
| Insert a tab |
Tab |
| Insert the literal word (e.g. insert the word "comma" instead of the punctuation mark)
|
Literal word |
| Insert the numeral form of a number |
Numeral number |
| Put the cursor before a specific word |
Go to word |
| Put the cursor after a specific word |
Go after word |
| Go to the start of the sentence that the cursor is in |
Go to start of sentence |
| Go to the start of the paragraph that the cursor is in |
Go to start of paragraph |
| Go to the start of the document |
Go to start of document |
| Go to the end of the sentence that the cursor is in |
Go to end of sentence |
| Go to the end of the paragraph that the cursor is in |
Go to end of paragraph |
| Go to the end of the current document |
Go to end of document |
| Select the word in the current document |
Select word |
| Select all text in the current document |
Select all |
| Select the last text you dictated |
Select that |
| Clear the selection on the screen |
Clear selection |
| Capitalize the first letter of the word |
Capitalize, Caps word |
| Capitalize all the letters of the word |
All capitalize, All caps word |
| Make all the letters in the word lowercase |
No capitalize, No caps word |
| Delete the selected or last dictated text |
Delete that |
| Select next sentence |
Select next sentence |
| Select next paragraph |
Select next paragraph
|
| Select previous sentence |
Select previous sentence |
| Select previous paragraph |
Select previous paragraph |
Punctuation
| To Do This |
Say This |
| , |
Comma |
| ; |
Semicolon |
| . |
Period; Dot; Decimal point |
| : |
Colon |
| " |
Open double quote; Open quote |
| " |
Close double quote; Close quote; Close inverted commas |
| ' |
Apostrophe |
| ' |
Open single quote |
| ' |
Close single quote |
| > |
Greater than sign |
| < |
Less than sign |
| / |
Forward slash |
| \ |
Backslash |
| ~ |
Tilde |
| @ |
At sign |
| ! |
Exclamation mark; Exclamation point |
| ? |
Question mark |
| # |
Number sign; Pound sign |
| $ |
Dollar sign |
| % |
Percent sign |
| ^ |
Caret |
| ( |
Open parenthesis; Open paren |
| ) |
Close parenthesis; Close paren |
| _ |
Underscore |
| - |
Hyphen; Minus sign; Dash |
| – |
En dash |
| — |
Em dash |
| = |
Equal sign |
| + |
Plus sign |
| { |
Open brace; Open curly bracket |
| } |
Close brace; Close curly bracket |
| [ |
Open bracket; Open square bracket |
| ] |
Close bracket; Close square bracket |
| | |
Vertical bar |
| :-) |
Smiley face |
| :-( |
Frowny face |
| ;-) |
Winky face |
| ™ |
Trademark sign |
| ¾ |
Three quarter sign |
| ¼ |
One quarter sign |
| ½ |
One half sign |
| £ |
Pound sterling sign |
| & |
Ampersand; And sign |
| * |
Asterisk |
| // |
Double slash |
| ` |
Back quote |
| < |
Open angle bracket |
| > |
Close angle bracket |
| ± |
Plus or minus sign |
| « |
Open angle quote |
| » |
Close angle quote |
| × |
Multiplication sign |
| ÷ |
Division sign |
| ¢ |
Cent sign |
| ¥ |
Yen sign |
| § |
Section sign |
| © |
Copyright sign |
| ® |
Registered sign, Registered trademark sign |
| ° |
Degree sign |
| ¶ |
Paragraph sign |
| … |
Ellipsis; Dot dot dot |
| ƒ |
Function sign |
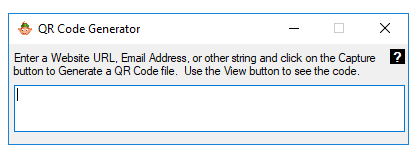
QR Code Generator


Overview
Screen Elf contains a QR Code Generator that can be used to generate black and white QR Codes.
What is a QR Code?
A QR Code (it stands for "Quick Response") is a mobile phone readable bar code that can store website URL's, plain text,
phone numbers, email addresses and any other alphanumeric data.
QR codes are square barcodes (two-dimensional barcodes) that were first developed and used in Japan. Like any other barcode,
a QR code is nothing more than a way to store information in a machine-readable optical label. You can place QR Codes
on your literature, merchandise and elsewhere, allowing your audience to scan the code with a mobile phone to take
them directly to your website, receive your email address or receive other information.
Creating QR Codes
The QR Code Generator let's you generate a QR Code from the string that you input into a text box.
To create a QR Code, select QR Code Generator in the dropdown box from the Tools menu.
A text box will appear. Enter the string that you wish to capture as a QR Code into the text and then click on the
capture button. The QR code will be generated and stored as a file in the folder specified in the Screen Capture tab.
Price Number Alarm

Overview
Screen Elf has an Optical Character Recognition (OCR) interface which let's you detect numbers in images on your screen.
The Price/Number Alarm feature can be used for unattended monitoring of numbers on your computer screen. An alarm can be
sounded and a recording automatically started when the number falls below a 'low' threshold or rises above a 'high'
threshold which you set. The screen recording will automatically stop when the number falls within your set ranges.
Price Number Alarm Settings
The Price/Number Alarm uses settings specified in the General tab and the Screen Capture tab of the Options dialog to
determine operation
Click on the Screen Elf Setup icon to open the Options dialog.
The following options are relevant to the Price/Number Alarm feature.
General Tab
Line Width - The width of the line used for the rectangle area.
Line Style - The style of the line used for the rectangle area.
Sound Alarm - Sound an alarm when the number threshold is surpassed and start recording the screen.
The recording will stop when the number falls back outside of the threshold.
Screen Capture Tab
Email Image on capture - Specify an email address to be alerted when the number passes the threshold. (Note: To use
this feature you need complete the email Server details in the Security tab.
Reset - Reset the Screen Capture tab to its default settings.
Monitor a Price/Number
To monitor a number, select Price/Number Alarm in the dropdown box from the Tools menu.
A translucent rectangle will appear. Place the rectangle over the number you wish to capture and adjust its
dimensions by draging its top right corner. Make sure that the number you wish to capture is firmly within the
colored rectangle. Specify a low threshold value in the Low text box, and a high threshold value
in the High text box.
Click on the green Capture button to start monitoring the number.
If the number falls below the low threshold or rises above the high threshold an alarm will sound, a recording of
your screen will begin and an email will be sent to you depending on the settings you have made. The recording will
automatically stop when the number falls outside of the threshhold.
To see the recording click on the View folder icon to bring up the file explorer dialog.
Double-Click on the file to launch your Windows media player to play the recording.
The reliability of the number detection is determined by the size of the characters you are monitoring. You can improve
accuracy by magnifying the characters on the screen by using your application zoom or other methods to increase character
size.

Surveillance
Overview
Screen Elf can be used to provide remote monitoring of a room or area or remote monitoring of the screen . Its
in-built timer and motion detector allows screen shots from your webcam or desktop to be emailed to you
periodically and also lets you obtain recordings triggered by movement in front of the webcam. The Webcam images
and recordings can be useful when you want to monitor a room or area for anti-theft or security purposes, and the
screen shots can be useful for unattended monitoring or parental control.
Security Settings
You can undertake surveillance using the settings specified in the Security tab of the Options dialog.
Click on the Screen Elf Setup icon to open the Options dialog.
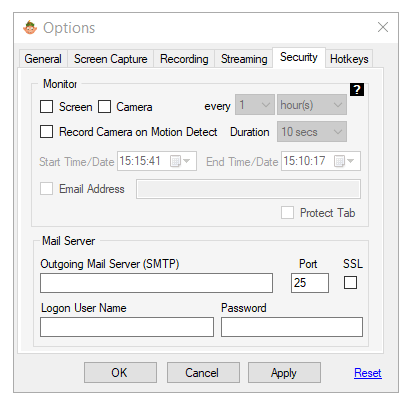
The following options are relevant to remote monitoring and surveillance.
Screen - Specify whether you wish to capture images from the screen.
Camera - Specify whether you wish to capture images from the Webcam/Camera.
Every - Specify how often you wish to capture the images.
Record on Motion Detect - Start recording from the Webcam when movement is detected
in front of the Webcam. Capture the screen image.
Duration - The duration of the recording when 'Record on Motion Detect' is enabled.
Start/End Time/Date - Specify on what date and at what time you want the monitoring to start and end.
(Select the date from the calendar, enter the time into the 24-hour text box)
Protect Tab - You can password protect the Security tab.
Email Files - Specify your email address.
Outgoing Mail Server - Specify your outgoing mail server details to enable files to be sent to you.
SSL - Enable if your outgoing mail Server requires an SSL connection. (typically No)
Logon User Name - Your Logon User name.
Password - Your Logon password.
Reset - Reset the Security tab to its default settings.
Remote Capture Screen
To remote capture the screen you can either select the 'Screen' checkbox or the Record on Motion checkbox or both.
Selecting the Screen checkbox allows you to capture the screen at regular intervals specifed by the dropdowns.
The Screen can also be captured when motion is detected in front of the Webcam.
Images from the Screen will be captured and emailed to you on the date, times and intervals that you specified in
the Security tab.
Remote Capture Webcam
To remote capture your Webcam/Camera you can either select the Camera checkbox or the Record on Motion checkbox or both.
Selecting the Camera checkbox allows you to capture the Camera at regular intervals specifed by the dropdowns.
The Camera can also be recorded when motion is detected in front of the camera.
Record on Motion Detect
Screen Elf can record your Webcam when movement is detected in front of the camera. The length of the recording is
set in the Duration dropdown. As well as recording your Webcam/Camera, when motion is detected a snapshot of the screen
is also taken.
NOTE:
Surveillance/monitoring will begin when Screen Elf is either minimized to the systray or is auto-hidden.
Screen Elf can only monitor the screen and camera when the application is running on your computer. To start
monitoring when the computer is launched, ensure that the setting Launch on PC Startup
is enabled in the General tab of the Options dialog and that the auto-hide checkbox is selected.
The display and Camera used to capture and record images are chosen in the Recording tab of the Options dialog.
Files will be captured and emailed to you on the date, times and intervals that you specify in the Security tab.
Hotkeys
Overview
You can use Hotkeys also known as Shortcut keys within Screen Elf to trigger actions instead of clicking with a
mouse on a button or selecting a menu item from the dropdown list. For instance you can use the default Hotkeys
combination Ctrl+5 to start recording and Ctrl+7 to stop recording.
Screen Elf divides Hotkeys into two categories. Hotkeys which trigger an action such as a click on a button to
capture the full screen, and Hotkeys which select a menu item in the dropdown list.
Hotkey Settings
Hotkeys use settings specified in the Hotkeys tab of the Options dialog to determine operation.
Click on the Screen Elf Setup icon to open the Options dialog.
The following options are relevant to the Hotkeys.
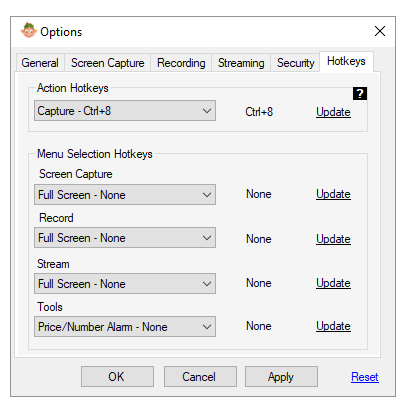
Action Hotkeys
In this group you can set the Hotkey combinations which will trigger an action. The default settings are:
- Capture - Ctrl+8
- Stop - Ctrl+7
- Pause/Resume - Ctrl+6
- Record - Ctrl+5
- Print - Ctrl+4
- Setup - Ctrl+3
- View - Ctrl+2
- Help - Ctrl+1
Menu Selection Hotkeys
In this group you can set the Hotkey combinations which will select a menu item from the dropdown list. The
default settings are that no Hotkeys are set for menu item selection.
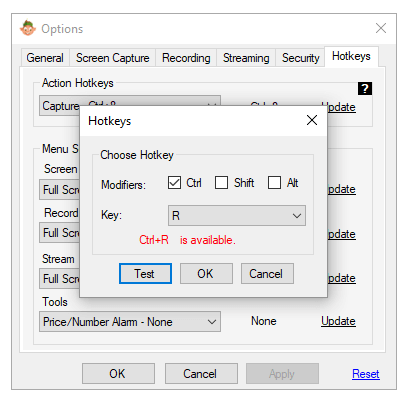
Setting a Hotkey
To set a Hotkey, select the Action or Menu item you wish to assign a Hotkey to from the appropriate dropdown list
and then click on the Update link. The Hotkeys dialog will open allowing you to choose the key combinations.
For instance if you wanted to be able to select the 'Record Full Screen' menu item using Ctrl+R, You would tick
the modifier Ctrl checkbox and select the key R. You can test whether the key combination is already been used
within Screen Elf by clicking on the Test button.
Note: You should avoid the use of Hotkey combinations which are already frequently used by other
applications. For instance Ctrl+C and Ctrl+V are typically used for Cut and Paste in most word processing
applications. You should also avoid the use of Function Keys if they are already assigned by other applications.
Removing a Hotkey
To remove a Hotkey combination simply uncheck the Ctrl,Shift and Alt check boxes in the Hotkey dialog and set the
Key to None. You can also reset all Hotkeys back to the default settings by clicking on the 'Reset' link at the
bottom of the tab.